Thursday, November 30, 2006

dulces de membrillo

Solon of ancient times is said to have decided that Cydonian apples should be presented to newlyweds. Since they are pleasant to the taste and the digestion, their delicious charm stays in the mouth, so that the breath is made sweet by them.
from alciato's book of emblems

Cydonia oblonga

Coines, Coing, Cydonian apple, Pineapple quince, Quince, Quitte

did you know that the original marmelade was not from citrus but from quince,
derived from the portuguese word for it, called 'marmela'?


i used to think my parents came to canada smuggling quince fruit deep in their suitcases. that's how much i remember seeing this odd, inedible raw fruit [obviously, looking back as an adult it was around only during its season but it did figure a lot in our diet]. i say odd because i was intrigued as a child that it tasted like absolutely nothing, was hard as a rock but smelled of perfume and seemed almost exotic.

well, it tasted like nothing until it was cooked.

related to both the apple and pear, quince is a common mediterranean and european fruit. it has a very rich history and a quite fascinating one. historic foods.com has an exceptional article all about it with beautiful pictures of the delicacies and elaborate designs confectioners would make with the paste. do check it out. it is one of my favourite sites when it comes to food history and information. the splendid table has a short radiocast about the quince you can listen to telling you all about the fruit giving you a bit of its history, how to buy one and how it's prepared.

the quince starts off as a beautiful pink flower growing on gnarled trees. both my parents had quince trees in their yards and remember when they came to bloom. my mother told me ladies would stop to look at the flowers much like one is struck when seeing a magnolia tree in full bloom. [i never thought the quince blooms were anywhere as dramatic though and could compare].

photo: wikipedia, quince

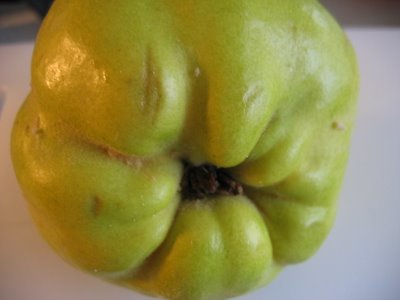
when mature and harvested, it is usually medium sized to as big as a fist and naturally covered in a downy coating however more during its immature state. this is washed/cleaned off when it comes to market and home. the ones i bought still had tell-tale signs of this coating. i tried to show it in the crevices of the photo below.
i grew up with knowing this called a few different ways — ayva, coing and membrillo/bimbriyo. none of my childhood friends at the time really knew what in the world this was if i mentioned it. it was foreign to them. quince has historically been a significant fruit in sephardic circles. in spanish it is called membrillo and is commonly jellied and served with manchego cheese in spain. in the ladino language it is called bimbriyo [the m is pronounced as a b], and is cooked the same way, used in jellies, jams and sweets. it is sometimes used in stews with meats and used as one of the fruits blessed at rosh hashana.

the quince is high in pectin so it gels very easily. this is why it was a favourite for making jellied sweets and various jams and marmelades. as noted earlier, it was the original marmelade. in this post, i am showing you a very, very old [sephardic] sweet called dulses de bimbriyo or in castillian spanish, dulces de membrillo. these are usually made at passover and the new year. this confection is actually in a class of its own called, of course, dulses. they can be made from different fruit and sometimes vegetables, like squash. here is a link for some recipes similar to this one.

it takes a little time to prepare this confection as it must sit over night and then later the sweets need to cure for a few days to firm up properly and form a skin — otherwise they are just sticky and not easily handled. the preparation is quite straightforward and simple. nothing complicated, at all.

when cut, the quince really does look like a cross
between a grannysmith apple and a pear


jellied quince sweets
dulses de bimbriyo (dulces de membrillo)

makes approx. 20 to 24 sweets


ingredients:

2 quite large quince
white sugar [equals amount of mashed quince]
lemon juice, from half a small lemon
whole walnut halves or blanched almonds
icing sugar

bowl of water or a few tablespoons orange flower water

method:

peel the quince, cut in half and core them. cut the fruit into equal sized chunks.


place the quince in a pan with about 3/4 cup of water. bring to a boil and then lower heat to simmer.


cook the quince, covered, for about a 1/2 hour until they are soft. check them every 10 minutes.

mash the fruit very well. you don't want chunks. alternatively, you may pass them through a food mill. do not use a blender or food processor.

measure out the quince purée and place in a medium sized bowl. remember how much it was and measure out the same amount of white sugar.
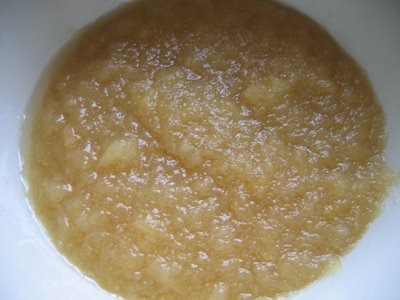
add the sugar to the purée and mix well. it will be exactly like applesauce but very thick.

let the quince pulp and sugar sit overnight. cover the bowl with plastic wrap.

the next day you will notice that it has thickened and gelled up somewhat. place this back in a pan which is wide. add the juice of half a lemon. sometimes we added 1/8 - 1/4 tsp of cinammon.

over medium heat, cook the quince sugar mixture, stirring all the time with a spatula. the idea is to cook it down to reduce the moisture content and to bind the sugar with the fruit. the pectin in the quince with help it hold together further.
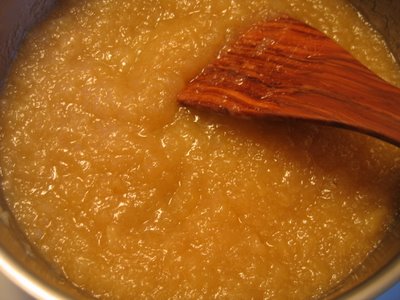
do not leave during the cooking process. it can burn and be ruined. keep stirring the mixture and turn it on top of itself. a good sign is that it will start to clear away from the sides of the pan. keep cooking it. eventually it will become more solid and putty like. it takes about 30 to 40 minutes in total, depending on your heat. do not cook it so much as to dry it out.

take this off the heat source and let it rest covered for about 10- 15 minutes. it should be warm and not hot. mash it with a potato masher. you don't want any lumps in it. do it for about a minute or so.

this is a picture of how it will look. do not let it cool too much or you will have problems with the following steps. if it does become too cool to work, reheat it a bit and mash it again.

take a spoon and make small one and a half inch [approximately] balls. when you roll the balls, you will need to have hands moistened with water, not dripping wet. put a bowl of water next to you when you work or you can you can also use a bit of orange flower water. put a 1/2 teaspoon in your palm and "wash your hands" by rubbing them together and repeat as needed. place these balls on a piece of parchement or foil on a cookie sheet. parchment is better. you should get from 20 - 24 approximately depending on how much quince paste you used. i started with 1 1/2 c of mashed quince.

take a walnut and place it in the center. push it in and flatten it slightly. it should be approximately an inch thick.
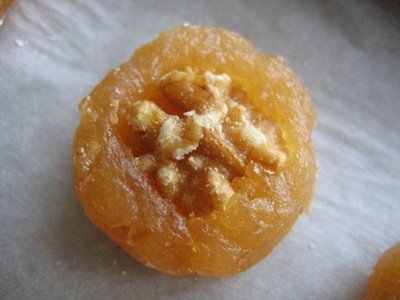
now let the dulses cure for 24 hours on one side. turn them over the next day and let the other side dry. this is all done uncovered. make sure it's in a dry place.
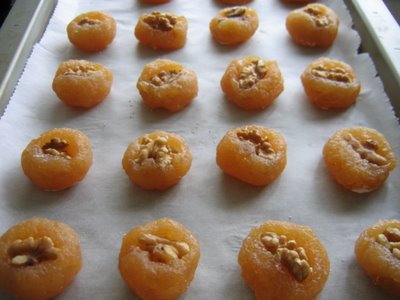
after they have cured, put icing sugar in a medium bowl or ziploc. place one or two candies in the sugar and roll to cover completely. these can be stored in a tin for a very long time. they actually taste better with age.

enjoy!

Wednesday, November 29, 2006

"the best" ever!

i sometimes laugh to myself when i read or see recipes that are called the best or ultimate and any other such names to that describe one's formula for some preparation. i have to admit however that i am [or have been] also guilty of it at times.

taste is a very personal thing, after all. what one person finds delicious and out of this world may not be another person's idea of perfection. i am sure this is a common finding amongst many a cook or foodblogger.

this also crosses over cultural lines. ashkenazi jews, for example love sweet things. i remember so many times when sephardi friends/family would be put off by some of the things they tried or exclaimed, "what is this?!! this isn't the way it's supposed to taste!" the same experience was often met the other way with anything from, "what's with all these spices?!" to "wow, this is so different and exotic."

in the end, we never know until we try something though many a time a good cook can "tell" by looking at ingredients, measures and instructions. sometimes though we don't take the time to read through a recipe or look at the instructions first. this recently happened to a friend of mine who emailed me for help. after making a batch of cookies which flopped and had to be thrown out, and this person KNOWS how to cook & bake, it was discovered that whoever who put out the recipe, screwed things up. i found the same recipe elsewhere and we figured out what was wrong.

so, getting back to my original intention for this post .... "the best ever," i am going to put in my submission, tongue in cheek, for THE BEST EVER chocolate chip cookies. yes, yes, not original at all. but they are just complete goodness.

these truly are, believe me, 'died-and-gone-to-heaven type cookies' [for me they are, at the very least]. i also say this more because for a cookie with no dairy products such as butter in it, you can't find better. you may though beg to differ, should you try them. beware, they are made with that, oooooh so terrible transfat called crisco™. these ones use the butter-flavoured version. i have used crisco, slash shortening, in small amounts my whole life. i still am alive and breathing. i wouldn't suggest using it as an everyday item but once in a while, in my eyes, is okay. i'm sure we've all eaten a lot worse.

this recipe is actually from the back of the box. a good friend of mine called me one day about a year ago and said, 'YOU HAVE TO TRY THESE!!'. since i trust this person's taste, i made them the next day. wow, they really are that good.

i like to use chocolate chunks instead of chips. the best, of course, are chunks of that silky smooth valrohna milk chocolate that you've broken up yourself and desperately tried not to gobble up in the process.

these cookies are not overly floury or chewy. in fact, they are kind of gooey. they are at their best when cooked for the exact time or maybe even a bit less depending on how well-calibrated your oven is. i end up making balls and freezing most of them on a cookiesheet and then put them in a ziploc to be taken out in various amounts. this helps me not to eat them all at one time! they also have no dairy products in them so depending on the type of chocolate you use.

as an endnote, it's not that there is anything earthshatteringly different in the ingredients. i think it's just the balance of what goes into them that makes them marvelously good.

so without further ado, here it is:

photo: not mine but this is how they look
with chunks of chocolate!
(check out jeff & drew's cookies from link!)

chocolate chip cookies
sans comparaison


ingredients:

3/4 c golden crisco shortening
1 1/4 c lightly packed brown sugar
1 egg
2 tbsp milk (or soy milk or water)
2 tsp vanilla
1 1/2 c AP flour
1 tsp salt
3/4 tsp baking soda
1 c chocolate chips or chunks*

1 c coarsely *chopped pecans [i don't use them]

note: *the recipe says you can omit the pecans and add 1/2 c more chocolate chips. i just keep it at one cup.

method:

preheat oven to 375 F.

cream crisco and brown sugar in large bowl for 2 minutes or until light.

add egg, milk [or soy milk or water], and vanilla and beat one more minute.

in another bowl combine the flour salt and baking soda. add this in 3 additions and blend well.

stir in, by hand, the chocolate chips.

either make balls and squash them a little or drop by tablespoons on a cookie sheet [ungreased] with 2 to 3 inches of spaces in between. they will expand as they cook.

bake for 8 to 10 minutes. i suggest trying 8 first.

remove cookies from oven and let them cool for 2 minutes away from heat [like on top of the oven] before removing to cool further.

make these & tell me these aren't the best!
enjoy!!

Tuesday, November 28, 2006

local flavour goes sour

photo: mccord museum, parc lafontaine, c 1910

something smells sour in my city today.

for the past while a battle has been going on in montreal to save the name of one of the names of our streets which is rich in history and a landmark of the immigrant experience. a street where everything and anything could be found. this is Park Avenue, or as it called here Avenue du Parc. many a jewish family, amongst the other numerous different immigrant groups, grew up either on, or around, this street. this is where they got their start, had their businesses and made a life for future generations.

photo: parc & pine avenue; bilan.usherbrooke.ca

it has been announced today that the battle to save the name of this historic street was lost. i cannot help but say, i am really pissed about this — as are many others.

it's new name? robert bourassa avenue after the now deceased premier of the province of quebec.

whatever.

while it may sound trivial to some, it is a big deal to many montrealers. it is a loss of history and yet another political move of the 101 plan.

i doubt it's over, monsieur mayor tremblay. unfortunately, you didn't listen to all the voices.

to see photos of this great street, take a look at this site.

cholent 101

this traditional sabbath dish is always eaten on saturday afternoons most typically upon return from synagogue sometime around the noon hour. it is a centuries old tradition with great history and lore around it. for those who have never had it, cholents are, in essence, long and slowly cooked stews. they fall into a group of dishes known as hamim/hamin; loosely translated it means hot & long cooked. it is cousins with other dishes such as the moroccan [a]dafina, greek & turkish hamin & iraqi t'beet.

all of these are started on thursday night and prepared early friday afternoon before the sabbath begins to be later set in an oven or on a blech or plata to cook at very low heat. this will cook from just before sunset and will be taken out some time on saturday, depending on the family's tradition. many times eggs are added, cooked all night and eaten at breakfast. these are called huevos haminados [eggs roasted in the hamin]; they become nutty brown inside and are really delicious in spite of what you may think of cooking an egg for all those hours. in modern times, people also cook cholent in the crockpot set on low.

what goes into cholents is entirely up to the cook. the main stars of the show however in an ashkenazi type cholent could not be humbler — some type of meat which will stand up to long hours of cooking [usually tougher pieces of meat], potatoes, beans & lentils of all sorts, seasonings as simple as salt & pepper and spices. all this is topped off with water.

there are as many variations as there are cooks. this may also be made the vegetarian way, omitting all meat. many families have their own special cholent handed down and changed here and there over the generations — families boasting theirs "is the one" to eat.

cholent, plain & simple askhenazi style

note: this can be made vegetarian by replacing the meat with seitan and/or tofu or just using the beans and vegetables. if adding more vegetables, use ones that will stand up to long hours of cooking and will not degrade in flavour or become bitter such as regular or sweet potatoes and carrots [basically, root vegetables].

ingredients
:

1/3 c. beans [mixture of navy/pea beans, kidney & pinto]
1/4 c. lentils [small brown ones]
1/4 c. pearl barley
2 tbsp baby lima beans

4 - 6 small potatoes, reds (ones which won't fall apart)

2 onions, chopped
4 cloves garlic, chopped

1 - 2 lbs flanken/short ribs
3 - 4 marrow bones

1 tbsp salt
2 1/2 tbsp sugar
1/2 tsp pepper
1 tsp paprika
1 tsp onion powder
1 tsp garlic powder

water to cover

method:

soak beans overnight [i wouldn't use/trust quick soak method here]. overnight is best.

measure out and arrange your mise en place for all ingredients.


as with all jewish recipes, fry your onions and garlic in a little oil until lightly browned. do not overcook these. set aside on a plate. i push mine aside but it takes experience and you may end up burning them so on a plate is best.

add the meat and brown it along with the marrow bones.

i also use extra firm tofu, so add these in whichever cut you wish and brown it also. sounds strange but it acts as an extra protein.

re-add the onions and garlic to the meat and then add the rinsed and drained beans, the potatoes [peeled and quartered], the lentils and spices.

add enough water to almost come to the top. do not add to much. cook this for 1 1/2 to 2 hrs on minimum temperature on top of the stove or in a medium-low oven at 300 F.

after 2 hours, add more water as necessary if it has evaporated or been completely absorbed. it should be fine. this is how it will look:


while this is cooking for the two hours, make your vegetable kishka. do this before you will put the cholent in the oven. you may prebake it for about a 1/2 hour to set it if you can't do it right beforehand.

vegetarian kishke — קישקע
recipe from spice & spirit cookbook

kishka is another old world ashkenazi item that is added to cholents as an added starch and way of extending the meal. kishka is basically {gulp} stuffed derma or intestine. well, folks, no intestines used here. only tin foil. the stuffing is composed of flour, oil, a few ground vegetables and a few spices & seasonings. it is usually served with a gravy. there is a version called hel(t)zel, where the skin of necks of chickens are sew together to make a pocket of sorts and stuffed with a similar flour mixture. sometimes the stuffing is enclosed and tied in a cheesecloth/gauze; the mixture then absorbs the flavours and sauces from the cholent during its long and slow cooking.

ingredients:

1/2 c oil
2 stalks celery, cut in 2" pieces
2 medium carrots, cut in 2" pieces
1 medium large onion, quartered
1 1/2 c AP flour
1 1/2 tsp salt
1 tsp paprika
pepper, to taste

tin foil, to wrap kishke
food processor or blender

method:


cut up the vegetables and measure out spices and flour.

in a large bowl, place the flour and spices and mix well to blend.

in the blender or processor, add the vegetables and oil and process until you have a paste.

transfer the paste to the flour mixture and mix well with a spatula until well blended.


measure out a piece of tin foil about the length of your fingertips to your elbow. do this twice.

put one piece of tinfoil on a counter making sure you are looking at it from a widthwise perspective and not a lengthwise one. about 4 inches up from the long edge, place the mixture and form a fat sausage type shape. make sure it's even. tuck in the sides and roll up. do this again to make sure it is well enclosed. i usually place it seam side down when doing the second rolling and use a heavy duty bbq type foil.


add the kisha on top and return this to the oven right before the beginning of the sabbath and cook until the next day at 200 F. depending upon the time of the year when this is made, it may cook for up to well past 12 hours. don't frett, it will be fine. the temperature is low. the custom however, for religious reasons concerning the laws of cooking [or should i say, not cooking] on the sabbath, is NOT to stir or add anything to it, save a cup of already hot water should it be drying out. this is poured on top and not stirred or agitated. the kishke roll can also be cooked alone with the cholent in the oven at 350F for 1 to 1 1/2 hrs. i usually go for the longer time.

by the end of the cooking time, it will have thickened. depending on your tastes, some people like it soupy and some like a thick mass. i prefer mine more soupy and take this into account when adding water. this has long been a matter of contention amongst cholent eaters!

here are two photos of what it will look like at different stages of cooking [i made this on a wedn/thurs to show you].

this is served when families return from synagogue saturday, around noon/1 pm. when made properly, it really is very, very good in spite of it's bad rap from those who either don't like it or have had bad ones.

it can also be made in a slow cooker as is often done however much less water is used due to the way a slow cooker works. i had disasters in the beginning by adding to much water and ended up with soup! it also dilutes the taste.

this is best made and eaten during the colder autumn and winter months. my favourite part of all is extracting the delicious marrow.

remember, the cholent can be made totally vegetarian too by using only seitan and/or tofu. the taste will obviously be different yet still very good.

here, again, is the finished dish with the marrow & kishke:

enjoy!

note: this post is still in the works. i will be adding extra information about this dish and links to interesting information, history and lore regarding it.

Monday, November 27, 2006

festive food fair

anna of morsels & musings downunder in australia has kindly invited me to participate in this year's festive food fair — a celebration of food from around the world for the upcoming holiday season. if you want to participate, click on her link and get your submission in by dec 1st!

thanks for all your hard work, anna.


here are my submissions:

traditionally, most goodies for hannukah are cooked in oil to commemorate the holiday. potato latkes are traditional ashkenazi fare whereas sweetened pieces of dough, deep fried and then either bathed in syrup or stuffed with a filling are the sephardic tradition.

also known in greek as loukoumades, lokma are addictive .... we eat platefuls of these at hanukkah and other holidays like purim.

deep-fried deliciousness!


lokma (bimuelos)

makes a lot. i suggest cutting the recipe in half if it is just for a few people or a small family. they can be made a few hours ahead and are meant to be served at room temperature. do not cover with plastic wrap or they will stick to it! use tin foil. they will be good the next day, too .... if there are any left!

see my post called, lokma lessons, and read it before starting this to get a visual idea of what you will be doing. this version does not use eggs or honey and is suitable for vegans.

ingredients:

2 to 2 1/4 c AP flour
1 1/2 tsp dry yeast [like fleischmann's reg or *rapidrise]
2 tsp sugar
3/4 tsp salt
1 1/4 c (up to 2 c) water [warm]
1 tbsp margarine melted
1 tsp lemon juice
1 - 2 tsp orange flower or rose water [optional]
orange or lemon zest [optional - add to dough]

3 c sugar
1 1/2 c water
2 tbsp lemon juice
1 -2 tbsp orange flower or rose water [optional]

finely ground or chopped pistachios
lemon or orange zest

method:

dissolve the yeast in 1/2 c water with 1 tsp sugar. when proved, add the rest [3/4 c] of the water, salt and sugar to the yeast and then the lemon juice and the flour and melted margarine. start with 2 c of flour. if it is too thin you may add the rest of the flour. mix well to make a thickish batter. add enough water to make a thick pancake like batter. let this rise for about an hour to an hour and a half. it needs to double.

*if you're using the rapid rise yeast, put all the dry ingredients together and add the wet ones. then continue recipe.

while that doubles, make the syrup. add sugar, water and lemon juice to a pot. put on medium heat and stir until all is dissolved. bring to a small boil and let syrup cooking WITHOUT STIRRING for about 10 to 15 minutes. if you stir you may seed/crystallize the sugar and ruin it. test after 10 minutes if it is thick enough. it should be a thin syrup but not too thin. sort of like maple syrup. add the orange or rose waters at the end, if using. keep aside as you make the lokma.

after the batter doubles, heat oil for deep frying. be careful!

put some oil in a small cup about a 1/4 c. with a tablespoon. coat the spoon with oil and dip into the batter and carefully add to the oil. we make small — think quail egg size — balls. re-dip the spoon every few times. fry the balls until golden about 3 minutes or so. turn them in the oil to make sure both sides brown. place them on a paper towel to absorb the oil. make sure that the oil is at the correct temperature — too low and they fry too long, absorb a lot of oil and become very hard and too hot, they will fry too quickly, taste raw and burn.

when they are all fried, rewarm the syrup and dip the pastries in it. the rule of thumb is always hot pastry to cold syrup or cold pastry to hot syrup to aid in absorption.

place on a platter and serve extra syrup to drizzle.

garnish with the lemon or orange zest and pistachios.

you may want to halve the recipe to try it out or if you are not serving many people.

enjoy!

* * * * *

biscuits bretons
butter cookies from brittany

picture to come soon!

ingredients:

1 1/2 c (3 sticks or 12 oz) unsalted butter, @ room temperature
1 1/4 c sugar
3/4 tsp salt
1 extra large egg
1 tsp vanilla extract
3 c cake flour

3 tbsps whole milk, for "wash"

method:

with an electric mixer on slow speed, cream the butter, sugar and salt together.

slowly add the egg and vanilla, continuing to beat on slow speed.

add the flour all at once and mix, scraping down the sides and bottom of the bowl once.

turn the dough out onto a piece of plastic wrap and pat into a 1/2-inch rectangle.

cover completely with the wrap and place in the refrigerator for about 1 hour, or until firm.

preheat oven to 35o°F. line cookie sheets with parchment paper.

on a lightly floured surface, roll out the dough until 1/4-inch thick.

with a 2-inch diameter, fluted round cookie cutter, cut out the cookies and place one inch apart on prepared sheets.

gather the scraps and refrigerate until firm enough to roll out again.

take a skewer or with the back of a knife score a tic-tac-toe design on the cookies. brush them with milk and bake for 10-15 minutes until a light golden color.

cool on a wire rack.

makes approximately 40 cookies. store in an airtight container.

whichever festival or tradition you celebrate,
happy holidays!